Slimline Z-Fold Hello Summer Card

Let's Make a Fun Slimline Z-Fold “Hello Summer” Card
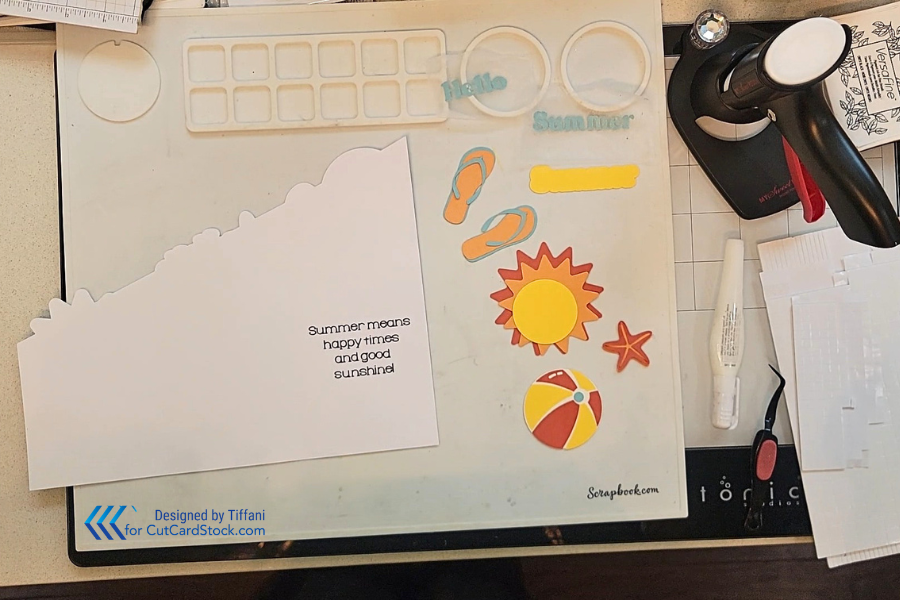
Hello again Krafty Friends! Today I’m bringing you a bright and cheerful project to welcome the sunshine—my Hello Summer Slimline Z-Fold Card! 🌞 This card is packed with warm colors, summer vibes, and fun little die-cut details, all made using a digital file I designed. You can cut everything using your electronic cutting machine, making assembly easy and enjoyable.
Supplies Used
All of the cardstock and envelope used in this project comes from CutCardStock.com, and here’s a breakdown of what I used for each piece:
Card Base: Cougar White 80 lb Cover Cardstock
Sentiment “Hello Summer”:
Yellow Jacket (80 lb) textured Discount Cardstock
Aqua (60 lb) Basis
Sun:
Yellow Jacket (80 lb) textured Discount Cardstock
Orange Fizz (65 lb) Pop Tone
Tangy Orange (65 lb) Pop Tone
Starfish:
Orange Fizz (65 lb) Pop Tone
Tangy Orange (65 lb) Pop Tone
Beach Ball:
Natural White (100 lb) Discount Cardstock
Yellow Jacket (80 lb) textured Discount Cardstock
Aqua (60 lb) Basis
Tangy Orange (65 lb) Pop Tone
Flip-Flops:
Aqua (60 lb) Basis
Orange Fizz (65 lb) Pop Tone
Nuvo Liquid glue (Amazon) and Nuvo Glue Pen (Amazon) - you can also get these from Scrapbook.com
Foam tape (Scrapbook.com) and foam squares (Amazon)
Bone folder (Amazon)
Reverse tweezers (Amazon)
Cougar Square Flap Envelope (Cutcardstock.com)
Assembling the Card
I started by cutting all of the pieces using my electronic cutting machine using the Hello Summer Z-Fold card SVG file I designed. The inside sentiment was written with a compatible pen tool using my own custom-designed font called Nova Slab, which is available in the Etsy shop if you’re interested in it!


Step-by-Step Assembly:
Prep Your Elements
Before adding anything to your card base, begin by assembling your smaller pieces:Beach Ball: Layer the colorful segments on top of the off-white base using liquid glue, then add foam tape to the back for dimension.
Flip-Flops: Adhere the orange top piece to the aqua base with foam tape if you want dimension, then glue the aqua straps on top.
Starfish: Simply glue the red-orange layer onto the orange base with liquid glue.
Sun: Use foam tape between each layer for a playful, dimensional effect.
Sentiment: Glue the word “summer” in aqua onto the yellow outline, then add foam strips behind the outline for extra lift.
Fold the Card Base
Fold along the prescored lines to form your Z-fold shape. I also used my bone folder to help make the fold. This will help you visualize placement before adhering your pieces.Attach Your Elements
Use liquid glue or foam tape to attach the sun, sentiment, starfish, flip-flops, and beach ball.
For pieces with outlines on the base, like the sun, starfish, Hello and flip flop, align them just slightly below their outline to create a subtle drop-shadow effect.
Personal Touches
You can add embellishments like enamel dots, sequins, or even a bit of ink blending for extra flair.
I stamped the back of the card with my “Handmade by Tiffani Hawkins” personalized stamp—feel free to do the same with your own!
Customize the Inside
In addition to the inside sentiment written with your machine’s pen. You can handwrite your message in the space below the pen written sentiment.


Don’t like the sentiment on the inside or don’t have a pen for your electronic cutting machine? No Problem!
If you don’t have an electronic cutting machine with a pen, you can still make this card! Simply skip/delete the step of writing the sentiment with the pen when cutting out your card. Just hand write or stamp what you like on the inside instead of using the machine to do it for you.
Final Thoughts
I absolutely love how this card turned out—it’s playful, dimensional, and full of those happy summer vibes ☀️🌴 Whether you're sending it to a friend or keeping it for inspiration, this card is sure to bring smiles.
You can also find a quick tutorial on my YouTube channel showing how to put together the Easter version of this style of slimline Z-fold card. If you decide to make one, I’d love to see it! Be sure to tag me or leave a comment.
💡 FYI: You can find all the supplies I use on the “Places I Shop” page on my website.
Thanks for stopping by, and as always—
Happy Crafting!
~ Tiffani
